ELAINE QUEHL, Quilt Artist, Teacher, Dyer, Designer

Friday, April 27, 2012

Dyeing Multi-Coloured Fabrics

After posting photos of my multi-coloured fabrics in my April 10 blog post, Laura asked if I might share how I dye them.  She was referring to fabrics like the ones in the photo above.  However, I use this very same method for most of the fabrics I dye, although the colours will vary.

For multi-hued fabric like those above, I start with three primary colours, a yellow, a red and a blue.  For the brightest palette, I choose yellow, fuschia and turquoise.  For a bit earthier palette, I choose golden yellow, scarlett and sky blue.  This doesn't mean, however, that I can't use the bright blue (turquoise) in the earthy palette, and vice versa.  Sometimes I will even combine two sets of primaries in one piece of fabric (yellow, golden yellow, fuschia, scarlett, turquoise and sky blue) or I might do two yellows, two reds, and only one blue.  Or sometimes I might use a navy blue instead of turquoise or sky blue.  Experiment!  It is the serendipitous end results that got me addicted to dyeing!

Bright palette of yellow, turquoise and fuschia

Earthy palette of golden yellow, scarlett, and sky blue

To prepare my fabric for dyeing, I rip it into the sizes I want, and throw it in my washer to rinse and spin.  I always start dyeing with wet fabric (unless I am using a soda soak method).  When dyeing for my business I like to work with one-meter pieces.  I dye them in plastic food containers purchased at Dollarama.  If you prefer to dye fat quarters, I like to do those on a plastic or styrofoam plate (in classes I teach, we pop the plate into a Zip Lock bag to make it easier and cleaner to transport home).

I mix up my dyes at full strength (1 Tb. dye powder per cup of water) for a good intense colour. You can adjust this downward if you prefer medium or light values.  Remember, with turquoise you always need to use twice as much dye powder!   I do use urea in the dye solution to increase the dye's solubility in water. 
You can see I've scrunched my wet fabric up and placed it in the containers.  This is what causes that nice mottled look you see in hand-dyes.  I usually begin with the yellow dye.  You are going to need a lot more yellow dye to do these multi-hued fabrics than you will red or blue.  Why?  Because yellow is a lighter value than red or blue and could easily be obliterated if you add too much red or blue.  Once you do add red to the yellow, you are going to see some orange developing where the yellow and red mix.  You will also start to see green developing when you add blue to the yellow because yellow and blue combined result in green.  Finally, once you add the red and the blue, some of that will mix to form purple.  It always takes way more yellow than red to produce orange and way more yellow than blue to produce green.   In the sample below I've decided to add both yellow and golden yellow to make the fabric even more complex.
Here is the one meter version in process
In the step below I've added the red.
And finally, in the last step of adding colour, I've added the blue, and you can see some green starting to show.
In all cases, you only want to add as much dye as the fabric will soak up.  If you add more than that, there will be puddling of all three primary colours in the bottom of the container, and you know what happens then, right?  You'll get some mud (brown).  I don't mind a little of this as it often tones the intense brightness down in these fabrics, but too much is not a good thing.  If you want brighter, clearer colours, you could always try the soda soak method (starting with dry fabric, soaking it in soda ash solution, wringing, and then applying dye).  I have done this but it caused problems for my shoulders wringing the large quantities of fabric I need to dye for my business.

Before I start any dyeing episode, I mix up my soda ash solution in a jug, so that once the dyes are applied, I can add it.  I add one cup of the solution to the meter of fabric 
and I will add 1/4 cup of the solution to the fat quarter.  The recipe is always one cup of soda ash solution per meter of fabric, so if you are doing 1/4 meter of fabric you will adjust accordingly.

Once I'm finished, I will let the fabric batch for about 24 hours.  Reds strike really fast, but blues, particularly turquoise, can take up to 24 hours for full development of colour.  Then it is time for the rinsing and washing.

Keep in mind that this method can be used with other colours as well.  If you want a really complex blue, try mixing up several blue dyes and adding them to the same piece of fabric.  You can also mix across colours, using several greens and a blue or blues on the same piece of fabric.  I taught myself to dye so I am not a dyeing purist.  Yes, there is a lot you can do by only working with primaries and mixing all your own colours, but I find it so much more interesting to also purchase already mixed colours and play with those.  I think that is actually the secret to the loveliness of my hand-dyes, if I do say so myself.

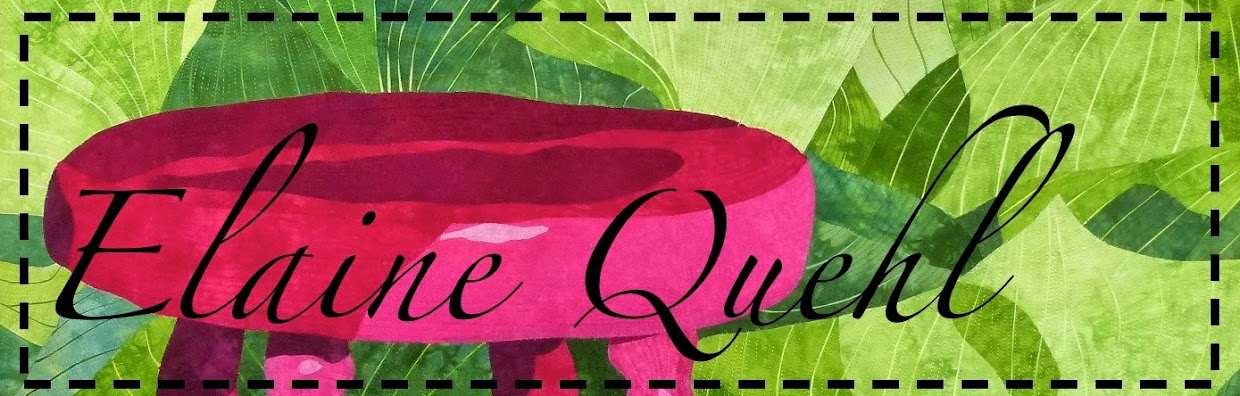
In my next post I will share photos of the fabrics once washed out.  I will also be sharing how I made my latest quilt, Red Stool II, pictured below.  It is my contribution to SAQA's One Foot Square auction this year.


Saturday, April 21, 2012

A Busy Week

It has been a busy week!  Last Saturday I taught a Resist Dyeing class for the Ottawa Valley Quilters Guild. The class included using flour paste and soy wax as resists.  By a "resist" I mean that the flour paste and soy wax are used to block the penetration of dye, hence leaving a pattern on the fabric.

With the flour paste resist you paint a paste made of flour and water (something like the consistency of pancake batter) on your fabric.  Once it is dry you can take out all your frustrations on it, scrunching it to form cracks in the dried flour paste.  After that you paint thickened dyes into the cracks. You can see more information and photos of the method in my January 9, 2011 blog post.

At home in my dungeon, er I mean basement, it usually takes at least 24 hours for the flour paste to dry, but we put them outside on a clear day and many of them were dry in only a few hours.  I just love this method!!!  Easy and always fabulous results!  Reminds me of old walls and walkways in Italy.

Here is the piece that resulted from the demo I did in class. Even my husband remarked on what a stunning fabric this is!  I started with a piece of fabric that had already been dyed a butterscotch colour, and painted the cracks with black dye.
Irene sent photos of her completed pieces.  Just lovely!

Here is Barb, hamming it up for the camera as I prepare for my demo.  By the way, that is a particulate mask on her head (to block the inhalation of dye powder). Normally it is worn over the nose and mouth ;-)) In Barb's hand is a french whisk, one of my favorite tools for soy wax batik, but it can also be used to mix your flour paste resist (although I just use a cheap one from the dollar store). 

Below is the soy wax batik station.  Students are using various tools (including the french whisk above) to stamp melted wax on their fabric.  The wax is melted in an electric frying pan on low heat.
Once the wax hardens, you can pin the fabric to a board and paint thickened dyes on it.  This method blocks dye penetration best so you get a crisper image, and also makes it easier to use several colours or have control of where the colour is placed. These are some of the fabrics I have created using this method.
Same method, but in this case I started with white fabric.
The waxed fabric can also be placed in a low-water immersion bath for a less crisp and more crinkly image.  You can see on the right-hand blue piece below that the waxed images are not as stark white as in the above photo (even though I also started with white fabric in that piece).  That is because in the low-water immersion dye bath the fabric is scrunched, and thus leads to a more crinkled design.


Here thickened dyes are being painted on the soy wax batik.  In this case three colours were used on the same piece of fabric
This student painted several colours in a more oval pattern.
Fabric is batched for 24 hours and washed.  Irene sent these photos of her finished soy wax batik fabrics.

A few people have asked about my introductory dyeing class.  Good news!  I have two scheduled in July.  July 16 at Dragonfly Fabrics in Ottawa, and July 7 in Belleville, Ontario.  The Belleville class is being held in conjunction with the SAQA Synthesis 2 show at the John Parrott Gallery.  I will be doing an artist talk on the Friday night, July 6, followed by a dyeing workshop on Saturday, July 7.  The class is open to anyone, so if you would like to register, please contact Joan Reive at joanreive@gmail.com

Tuesday I was off to Pembroke to deliver a lecture for the Pembroke Log Cabin Quilters Guild.  Pembroke is a two hour drive northwest of Ottawa. There was a great turnout for the lecture.

I stayed overnight and taught my Surface Design class on Wednesday.  There is something about getting messy with paint and dye that makes many people happy!  This was an introductory class on how to use many surface design products, such as Prismacolor Artist Pencils, Caran D'Ache Neocolor 2 Watersoluble Wax Pastels, Shiva Paintstiks, Tsukineko Inks, and Foils.  I will be teaching a full week-long version of this class the week of July 30 - August 3 at the Haliburton School of the Arts.  Students will be able to use them in more depth and actually create a small work using each method.

Yesterday I taught my Fast & Fun Fused Designs class at Dragonfly Fabrics in Ottawa.  In this class, many students get permission for the first time to cut free-hand without patterns. I never attended kindergarden because it didn't exist where I grew up, so I'm making up for it now!  Students are always surprised at how easy it is to cut something stunning once they learn a few tricks and give themselves permission. Many also find it immensely gratifying and liberating.


The first months of this year have been particularly busy with teaching, and a little challenging with the state of my knees.  I did get my diagnosis last week, although I thought it best not to report on it when I was interpreting everything through the lens of grief after losing my cat.  The good news is that I don't have a torn meniscus, but the bad news is that I do have significant degenerative arthritic disease (osteo-arthritis), with some "loose bodies" in the knee that have been causing the greatest problem (locking, swelling and pain).  However, I am doing much better, thanks probably in large part because of physiotherapy and leg strengthening exercises. I'm being referred to an orthopaedic surgeon to see if I'll need arthroscopy to remove the "loose bodies" and to assess the state of my knees. That wait will be at least another three months, and if surgery is required, that could mean another six month wait after that.  All I can do for now is manage it with exercise, weight reduction to reduce the stress on my knees, and painkillers and icing when necessary.  So for anyone that is wondering, I expect to meet all my teaching commitments this year.

With fewer workshops in the next two weeks I'll be catching up on paperwork.  I owe quite a few groups teaching contracts! I also hope to blog about a few topics other than my teaching trips.  Topics I plan to cover include the following:  how I dye my multi-coloured fabrics (such as the convergence ones I showed a photo of in my April 19, 2012 post), the thorny issue of copyright, and I hope to share some work from my upcoming drawing and painting class that begins this week.  I managed to find one that will fit my schedule with only one or two classes missed!!  Yipee!  Stay tuned.

Friday, April 13, 2012

Correction to Last Post

Please note there is a line missing in the poem at the end of my last post, "Letting Go".  Here is the corrected poem:

"To live in this world
you must be able
to do three things:
to love what is mortal;
to hold it
against your bones knowing
your own life depends on it;
and, when the time comes to let it
go,
to let it go."

(from "In Blackwater Woods" by Mary Oliver)

Letting Go

Today was a beautiful spring day, just the kind of day Johnnie would have loved to sit on the back step in the sun, so I sat there in his place.  The garden is teeming with life, even though Johnnie lost his yesterday.  Read no further if you have never lost an animal companion and know the heartbreak.

Johnnie came into my life when I was only 33, that is THIRTY THREE; I am now 50.  He showed up in our back yard one winter.  He appeared to have no home, and only had the shelter of the neighbour's deck.  My husband started leaving food out for him, and gradually he came to trust us more and more, until by Easter 1995 he moved into our house.  He came with chapped paws and wind-burned ears.  I always admired and respected his resilience. He always appreciated having a safe and warm home.

Our vet placed Johnnie at one or two years old when he arrived.  He was euthanized yesterday at 18 or 19.  What does this have to do with art quilts?  Johnnie accompanied me through every quilt I made.  He saw me make my first quilt.  He sat on every quilt that was fed through my sewing machine and any finished quilt that was left within sitting distance.  He was my studio assistant, my apron string, and in many ways my best friend.  He inspired a quilt by his charming behaviour of being mesmerized by my aquarium.

The quilt was called "One Fish, Two Fish, Striped Fish, Blue Fish" (2004)

He also inspired many nicknames like Johnny Rockets, Johnny Pneumonic, and in his last few months, "Johnny on the Spot".

Sitting in the sun was what he loved best, well maybe next best to sitting on my lap.

Even when he went blind two years ago, he remained a contented cat, adapting to his circumstances, and proving his resilience again and again.  All of the following pictures show him happy and well despite his blindnesss.
 He loved being in the garden in spring and summer, and was never so foolish as to venture outdoors again in winter after being rescued from winter.

The house feels empty today, even though we still have two cats.  There is no one to sit on my lap the minute I sit in the living room, especially when I am icing my knee, no one to greet me at the door when I come home from trips.  Seeing his health decline in the last two years, I always worried I would be away on a teaching trip and not be there for him when his time came.  I am grateful we were able to spend this past Easter weekend together, with him glued to my lap, and I am grateful I was able to stay with him until the end.  A "mother" is supposed to love all her "children" equally, but I've never had such a bond with an animal before.


I am reminded of the last lines of the poem "In Blackwater Woods" by Mary Oliver,

"To live in this world
   you must be able
to do three things:
to love what is mortal;
to hold it
   against your bones knowing
your own life depends on it;
and, when the time comes to let it
go,
to let it go."

Letting go is indeed the hardest part.  Johnnie, you were the best and I shall miss you always!

Tuesday, April 10, 2012

Update

The winner of last week's book give-away is Gail Segreto of Elizabeth, Colorado.  Your book was mailed this morning Gail.  I hope you enjoy it.  The book must be selling like hotcakes as I ordered a couple more copies from Amazon.ca, only to find they are now backordered. 
I hope you had a wonderful Easter weekend.  I got to stay home with my husband and three geriatric cats.  My blind Johnnie was glued to my lap at every chance he got!  Here is the rear view of him sitting on my lap. 

Although the weekend was chilly, we enjoyed bright sunny days.  I spent some time in the backyard, accompanied by my three cats. It is amazing how well a blind cat does in his own backyard.  He always finds the backdoor when he is ready to come back in.

I checked out all the new life springing up, and yes, green is still my favorite colour!

On the weekend I drafted an article that is due soon for an on-line quilting magazine.  I will share more details when the article is published.  I also dyed 22 meters of multi-coloured fabric.  There is a class happening at the local guild where students will be making convergence quilts and I was asked if I could provide fabric.  Here is a photo of the convergence-type fabrics in my own stash because I haven't ironed the ones for sale yet.  They are very similar.

Last week I travelled up the Ottawa Valley and spent two days teaching for the Renfrew Quilters Guild.  On the first day I had 13 students in "Introduction to Machine Quilting", and on the second I had four students in "In Full Bloom".  You can see the four here working on their flowers.  It was a great experience teaching such a small class and being able to provide a lot more individual attention to each student.


Right now I'm preparing for my Resist Dyeing class at the Ottawa Valley Quilters Guild this Saturday.  I need to simplify and clarify everything because there will be a few students who are new to dyeing.  My Resist Dyeing class will include flour paste resist and soy wax batik.  I will report back later next week.  I ill be heading back up the Ottawa Valley next week to spend two days with the Pembroke Quilters Guild.  When I get back I have several local classes to deliver.


Oh, and I'm pleased to share that I've signed up for a drawing class through the Ottawa School of Art at the Shenkman Ars Centre.  I found one that will fit into my schedule fairly well, and I will only miss one or two classes because of teaching commitments.  Class starts April 25!

That's all the news in my world.  When the Spring teaching season settles down I hope to make some progress in my studio, and I will be sure to post pictures when I do!

Tuesday, April 3, 2012

Natural World: Blog Give-Away 2

The winner of the first book give-away was Jackie White of Manitowaning, Ontario.  Jackie, your book was shipped yesterday.

Since I'm heading out of town to teach for the next two days I thought I would do the second blog give-away of "Art Quilt Portfolio; The Natural World" today, since we are also heading into a long weekend.  The first person to post a message to my blog will win a copy.

Good luck!